How to Sew a Recessed/Inset Zipper to a Bag
If you have ever wanted to take your bag making skills to the next level, this is a good place to start, a recessed zipper! It's not that difficult to do, just several steps to complete; sometimes time consuming. This post is pic heavy because I wanted to walk you through this process step by step. Hope you can figure it out! Let's get started!
First, start off with 2 strips of fabric that are 3 x width of your bag. My strips are 3 x 11 because the width of my bag is 11".
At each end of the fabric, fold over the ends, approximately 3/8" and iron to flatten. Be sure that they are even. This will be important later on. : )
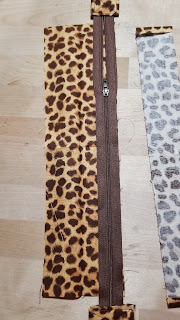
With one of the 3 x 11 panels, place the strip so the right sides are touching, as shown below. Insert the zipper into that fabric and line up the raw edges. Zipper pull should be face DOWN, as shown.
It should look like the photo below. Iron it to flatten.
Top stitch 1/8" - close to the zipper.
Prepare the other side of the zipper the same way as you did the first. Fold over the completed size and incase it into the unsewn fabric layer. Pretty side of the unsewn strip should be facing the pretty side of the completed strip - which is attached to the zipper. Line up the raw edges, as you have done in the step above. Sew down the right side.
Get the lining of your fabric. Fold the lining fabric in half lengthwise to find where the middle of the fabric is. Do the same with the zipper. Do not line up the ends of the zipper tabs, rather finished edge of fabric -that clean, folded, finished edge you made in step 1 - to the finished edge of fabric. Mark the middle of both of them.
Once you have found the middle of both, measure down 1 or 1 1/2 inches from the top raw edge of the lining, on the right side of the fabric, as shown in picture below. Look for the pen mark... Draw a line across the width of the fabric.
The lining will sit inside of your tote bag like the above picture. You can finish off the bag the way you normally would, matching the top raw edges with the top raw edges of the outer, interfaced fabric and pushing the zipper pulls inside of the bag, to be able to sew down the left and right sides of the lining like you normally would.


0 Comments